What says summer more than a floral dress?
A floral WRAP dress with RUFFLES of course!!!

If you like what you see above, I suggest that you continue reading!
I am going to break this dress down into easy steps, so that you can recreate this look and breeze through summer looking stylish.
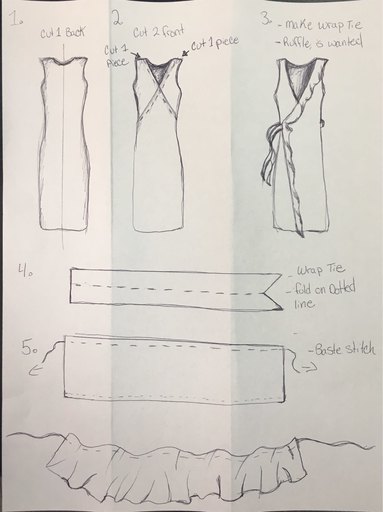
This is quick illustration of the steps I took to create the individual pieces that assemble the garment.
1. Cut out both back and front panels by using a stretch dress that you like the fit of as a pattern guide. Make sure you leave close to an inch extra around the dress for seam allowance.
2. Make sure when cutting out the front you cut out two pieces. Cut a diagonal for the neckline down to the waist, making sure that you do it on opposite sides for each piece. (Allowing the pieces to wrap over one another.)
3. Create two wrap ties that will attach on to each side of the front panels at the bottom of the diagonal cuts. (Make sure the one that will wrap all the way around your body will be long enough to be able to tie to the front tie.) See image for if you nee help on creating the tie piece.
4. If you want to add a front ruffle like I did above you will need to follow step 5. By cutting a wide strip that is long enough to attach to the length of the front panel, and then add a few more inches on to be able to achieve a ruffle.
5. Hem under one side of the ruffle and then baste stitch the other side length wise. The baste stitch allows you to pull the thread to scrunch up the fabric to create a ruffled effect.
6. Step 6 is not shown above but you sew all the seams together, attaching the ruffle and wrap ties. And by that point you will have only one step left, to create the hole on the side near the overlapping front panel so that the inner tie can go out and wrap around the back side of the body.
Images of my step by step process!
Other fabulous fabrics that would work great for a wrap dress!
Make sure to visit www.elliottbermantextiles.com to view all of the fabrics available to recreate this look!


 RSS Feed
